Introduction
Understanding the Checklist Interface
Checklist Status Indicators
Reviewing Checklist Items
Handling Items with Errors
Working with AI-Verified Items
Rejection and Regeneration Process
Approving Documents
Escalation Process
Navigation and Progress Tracking
Best Practices
FAQ
The Verifi action-based checklist is a systematic review tool that guides you through document verification and approval. The AI pre-analyzes each document against your organization's configured compliance requirements, flagging items that need user attention while automatically verifying items that meet standard criteria.
Key Objective: Ensure all financial documents are accurate, compliant, and ready for posting to your e-conomic ERP system before approval.
Important: You must complete the entire checklist in one session. Progress cannot be saved for later completion.
The checklist appears alongside the document being analyzed, providing a structured approach to document review.
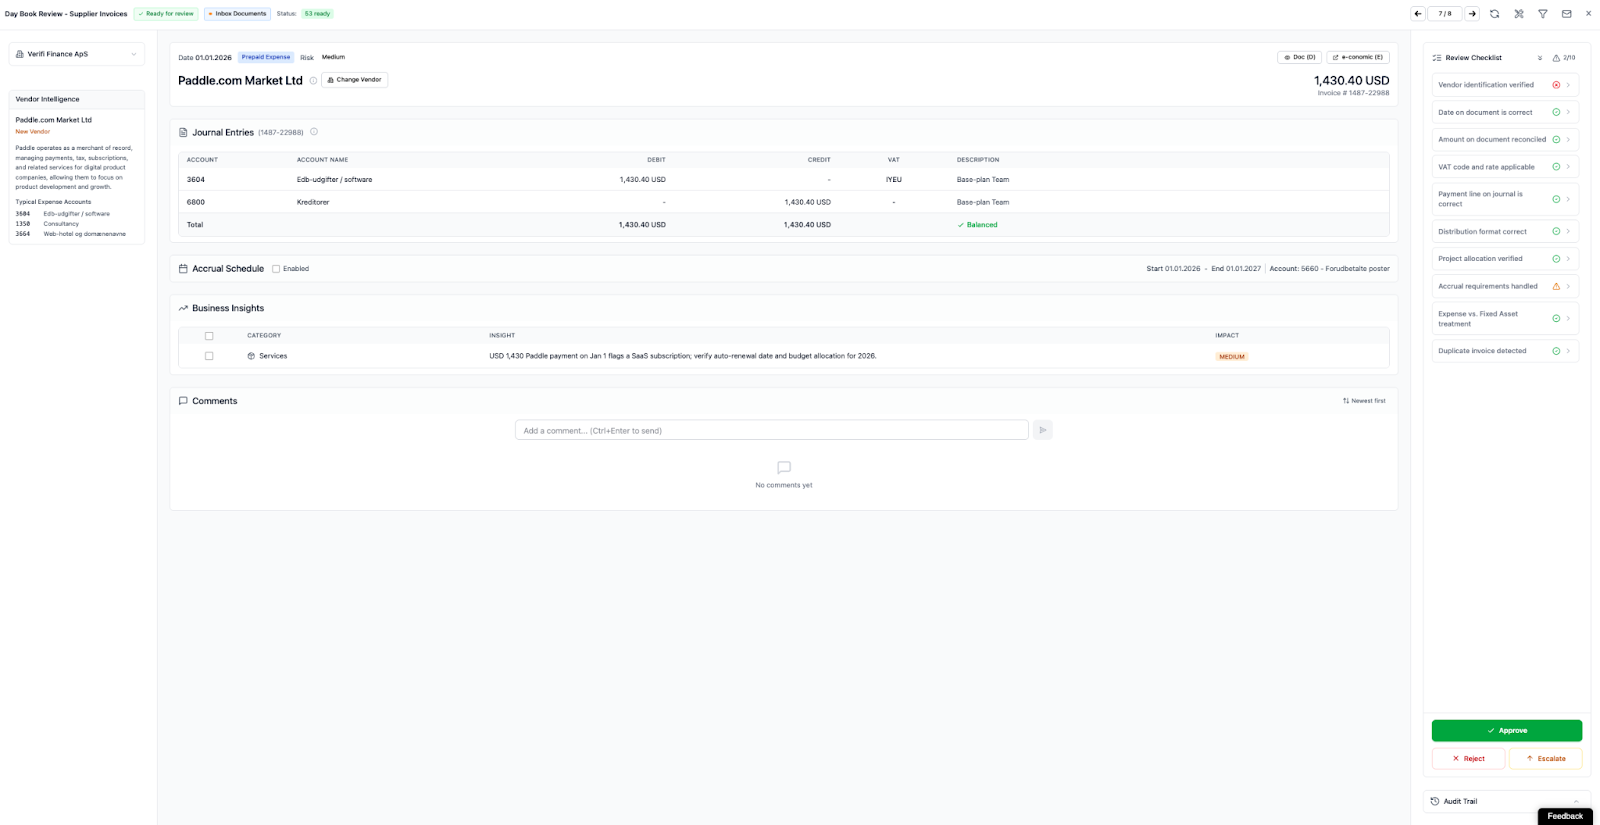
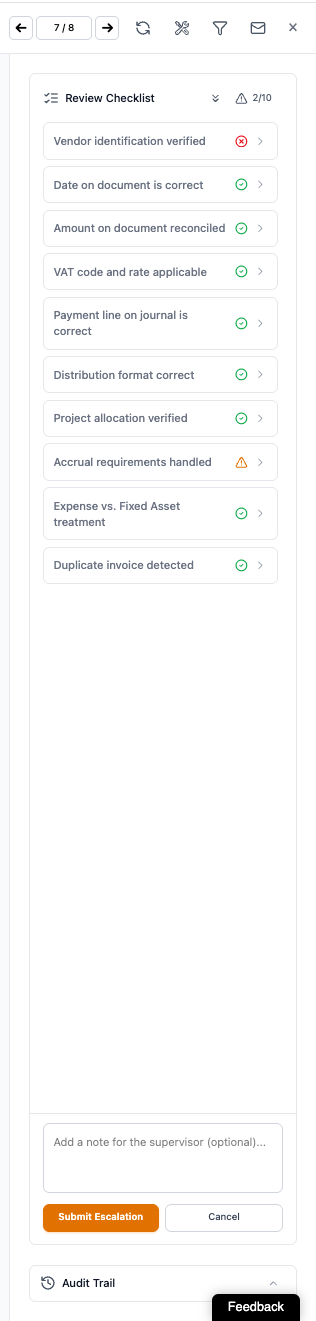
Header Section:
Review Checklist Title: Identifies the current review type
Warning Icon with Counter (1/10): Indicates the number of items requiring attention out of total checklist items
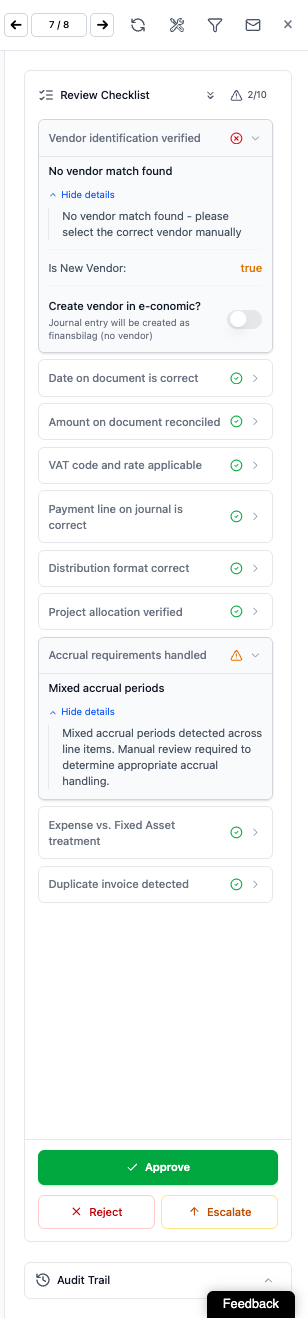
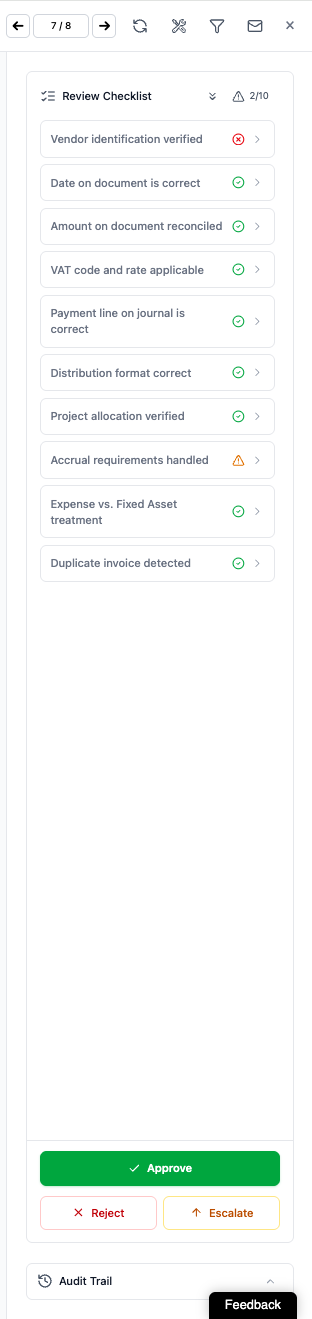
Document Counter (7/8): Shows your position in the document queue (currently reviewing document 7 of 8 total documents)
Navigation Controls:
Left Arrow: Navigate to previous document
Right Arrow: Navigate to next document (Note: automatic navigation occurs after approval)
Additional Icons: Refresh, filter, and other utility functions
Checklist Items: Each item represents a specific compliance or accuracy check configured by your organization administrator. Common checklist items include:
Vendor identification verified
Date on document is correct
Amount on document reconciled
VAT code and rate applicable
Payment line on journal is correct
Distribution format correct
Project allocation verified
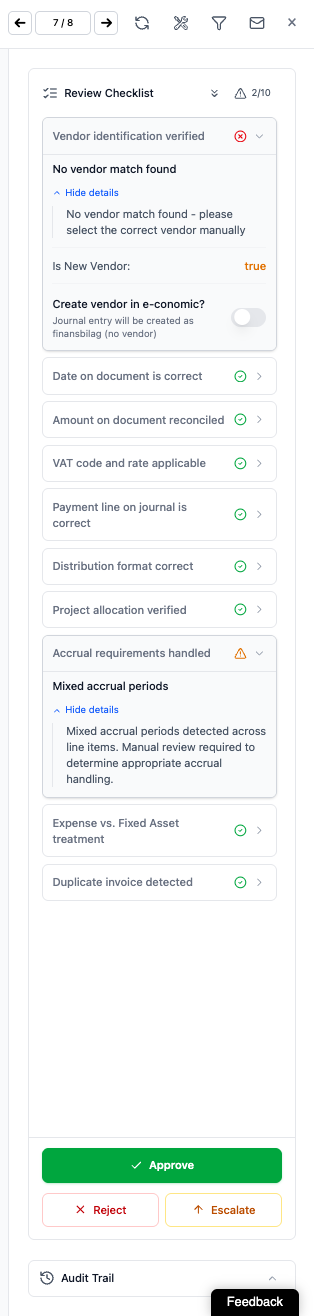
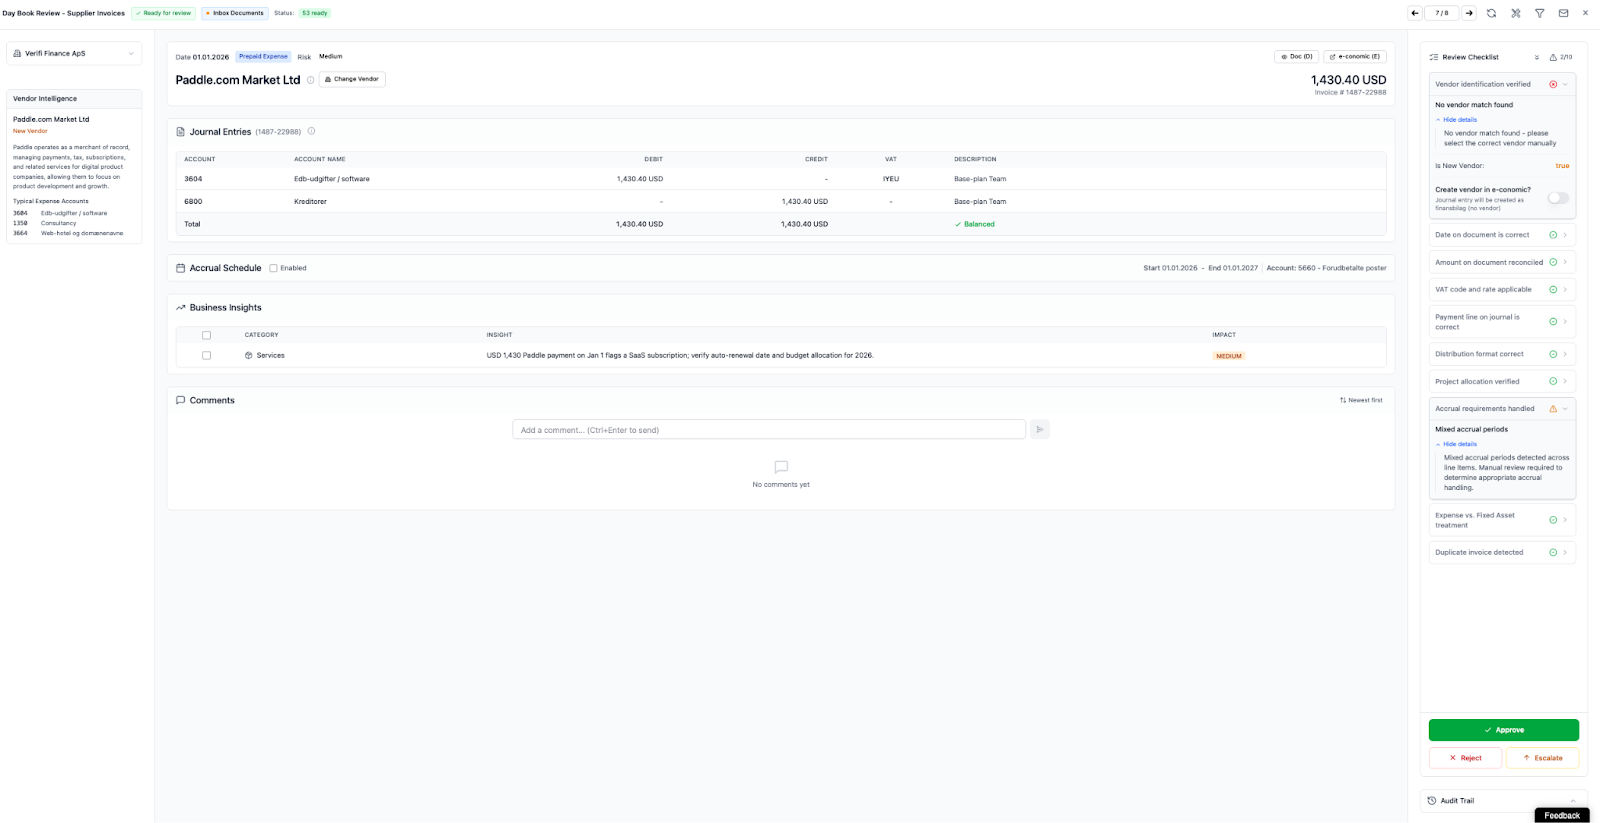
Accrual requirements handled
Expense vs. Fixed Asset treatment
Duplicate invoice detected
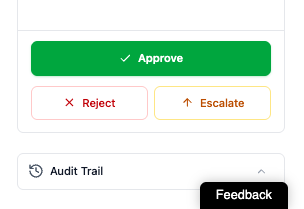
Action Buttons (Bottom):
Approve (Green): Accept all verifications and post to ERP
Reject (Red): Reject the entire document with comments
Escalate (Orange): Send document to supervisor/manager for review
Audit Trail:
Accessible via the expandable section at the bottom
Logs all actions taken on the document
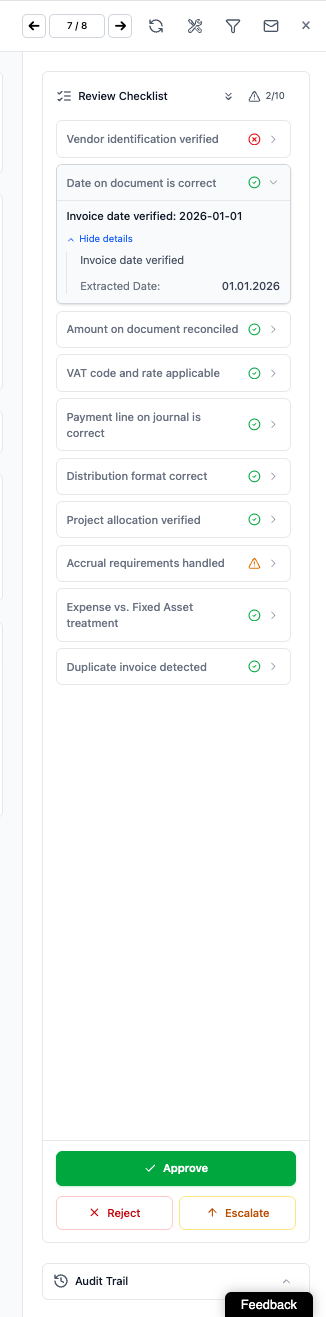
Each checklist item displays a status indicator showing its current state.
Meaning: AI has verified this item and found it compliant. No user intervention required.
Action Required: None by default. These items are collapsed and do not require review.
Optional Review: You may expand green checkmark items to verify the AI's analysis if desired.
Meaning: The AI detected an issue or could not automatically verify this item. Human review and decision required.
Action Required: Mandatory review and resolution before document approval.
Common Reasons for Red X:
Missing or unrecognizable data
Data inconsistency detected
Information outside expected parameters
New vendor or account not in system
Duplicate document detected
Manual verification required by policy
Review the checklist from top to bottom (or in any order you prefer)
Focus on items marked with red X indicators
Expand items to view details and AI findings
Verify green checkmark items if needed (optional)
Make corrections, rejections, or manual entries as required
Approve when all items are satisfactorily resolved
Click on any checklist item to expand it and view detailed information.
For Green Checkmark Items: The expansion shows the AI's verification details, including extracted data and confirmation of compliance.
Example: "Date on document is correct"
Shows: "Invoice date verified: 2025-12-30"
Shows: "Extracted Date: 30.12.2025"
Allows you to verify the AI correctly identified and validated the date
For Red X Items: The expansion shows the specific issue detected and may provide action options.
Example: "Vendor identification verified"
Shows: "No vendor match found"
Shows: "Is New Vendor: true"
Provides option: "Create vendor in e-conomic?" (toggle)
Items include "Show details" and "Hide details" links to expand or collapse information. Use these to review AI findings without cluttering your checklist view.
When you encounter a red X item, follow this systematic approach to resolution.
Expand the item and read the error description carefully.
Common Error Messages:
"No vendor match found" - Vendor not in e-conomic system
"Amount mismatch detected" - Discrepancy between document and expected value
"VAT code unclear" - AI cannot determine correct VAT treatment
"Date format inconsistent" - Date extraction failed or appears incorrect
"Duplicate detected" - Potential duplicate invoice identified
Cross-reference the checklist item with the actual document displayed alongside the checklist. You can do this by pressing ‘D’ on your keyboard or clicking the ‘Doc’ button.
Verification Questions:
Does the document contain the information the AI is looking for?
Is the AI's interpretation of the data correct?
If data is missing, is it legitimately absent or did the AI miss it?
If a discrepancy exists, which source is correct (document or system)?
Based on your verification, choose one of the following actions:
Option A: The AI is Correct - Issue Exists
Accept the AI's finding
Take corrective action (create vendor, adjust amount, etc.)
Approve after correction
Option B: The AI is Incorrect - Suggest Regeneration
Submit a rejection with explanatory comments
Wait for AI regeneration
Review new AI suggestion
Approve if corrected
Option C: Escalation Required
If you're unsure or lack authority to resolve
Use the Escalate button to send to supervisor
Document will be routed to appropriate reviewer
Follow the specific process for your chosen action (detailed in subsequent sections).
Items with green checkmarks have been automatically verified by the AI and require no action by default.
While these items don't require review, you may choose to verify them in the following situations:
High-Value Transactions: For transactions above your organization's materiality threshold, consider spot-checking AI verifications.
Unusual or Infrequent Transactions: Review AI findings for transactions outside normal business patterns.
Training and Familiarity: When learning Verifi, periodically review green items to understand the AI's verification process.
Audit Preparation: Before period close or external audits, validate a sample of AI-verified items.
Click on the green checkmark item to expand it
Review the "Show details" section to see AI findings
Verify the extracted data matches the document
Confirm the verification logic is sound
Collapse the item if satisfied, or submit a rejection if you identify an error
Important: Even green checkmark items can be rejected if you identify an error in the AI's verification.
When the AI's suggestion is incorrect or you've identified an error in a verified item, use the rejection process to provide feedback and request regeneration.
Step 1: Review the Checklist Item Expand the item and confirm the AI's suggestion or verification is incorrect.
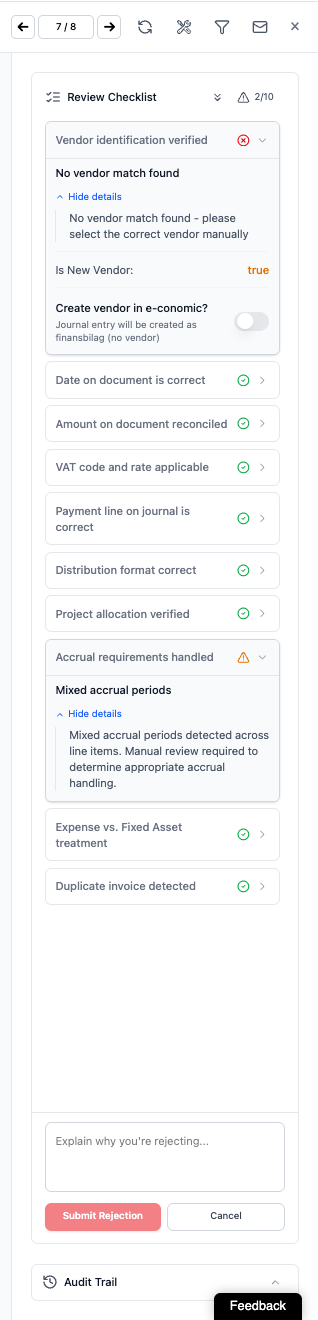
Step 2: Provide Explanatory Comments Scroll to the bottom of the checklist where you'll find the rejection interface with a text field labeled "Explain why you're rejecting..."
Enter clear, specific comments explaining:
What the AI got wrong
What the correct information should be
Why the correction is necessary (if not obvious)
Example Comments:
"Vendor name is 'Acme Supplies Ltd' not 'Acme Ltd'. The full legal entity name must be used for vendor creation."
"Invoice date should be 2025-12-15, not 2025-12-30. The AI extracted the due date instead of the invoice date."
"VAT code should be 3 (20% standard rate) not 0 (zero-rated). Office supplies are standard-rated in our jurisdiction."
"Amount is correct at €1,250.00. The AI flagged this as a mismatch, but this represents a credit note reducing the original invoice value."
Step 3: Submit Rejection Click the "Submit Rejection" button (pink/red) to send your feedback to the AI.
Step 4: Wait for Regeneration The AI will immediately process your feedback and generate a new suggestion. This typically takes only a few seconds.
Step 5: Review Regenerated Suggestion The checklist item will update in place with the AI's new suggestion incorporating your feedback.
If the regeneration is correct, the item may automatically change to a green checkmark
If still incorrect, repeat the rejection process with additional clarifying comments
There is no limit to the number of rejection cycles
Step 6: Accept When Satisfied Once the AI generates the correct suggestion, proceed with document approval.
If you begin entering rejection comments but decide not to submit, click the "Cancel" button to discard your comments and close the rejection interface.
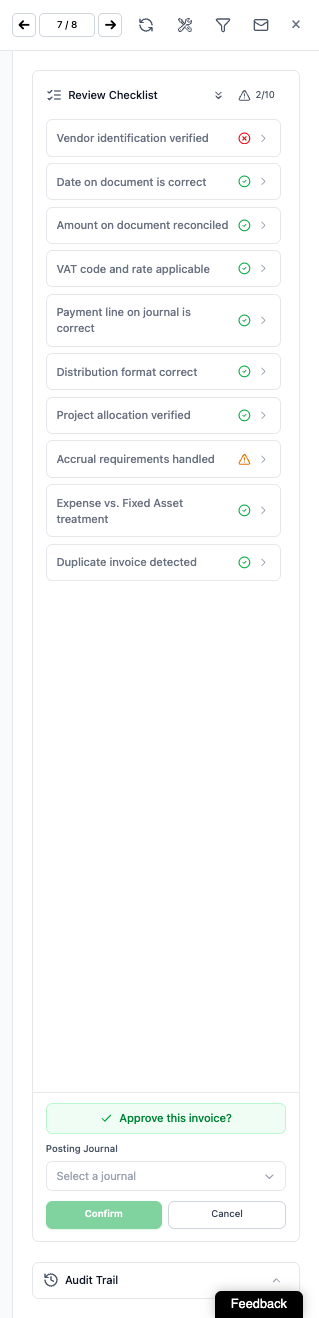
Once you've reviewed all checklist items and are satisfied with the document's accuracy and compliance, hit the approve button for posting to your e-conomic ERP system.
Before clicking Approve, verify:
All Red X Items Addressed:
You've reviewed each red X item
Issues have been corrected or determined to be acceptable
Any necessary rejections and regenerations are complete
Confidence in Accuracy:
The document data is correct and complete
All accounting treatments are appropriate
Compliance requirements are met
No Outstanding Questions:
You don't have unresolved concerns about the document
If uncertainties exist, use Escalate instead of Approve
Step 1: Click the Green "Approve" Button Located at the bottom of the checklist interface.
Step 2: Automatic Posting Verifi then posts the document data to your e-conomic ERP system. There is a step inbetween to ensure you mean to make the posting.

Step 3: Automatic Navigation Upon successful posting, Verifi automatically advances to the next document in your queue (e.g., from document 6/8 to 7/8).
Step 4: Continue Processing Repeat the review process for the next document until your queue is complete.
Approving with Red X Items: You can technically approve a document even if red X items remain unresolved. However:
This is not recommended practice
The audit trail will log that you approved with outstanding issues
You may be accountable for any resulting errors in your ERP system
Some organizations may have policies prohibiting this
No Undo Function: Once fully approved, the document is posted to e-conomic. If you discover an error after approval, you must make corrections directly in your ERP system using standard reversal or adjustment procedures.
Session Completion: You must complete the entire checklist and approve (or reject/escalate) before ending your session. Work cannot be saved for later completion.
When you encounter a document that requires additional expertise, managerial approval, or falls outside your authority, use the escalation feature.
Lack of Expertise:
Document involves complex accounting treatment you're unfamiliar with
Specialized tax or regulatory knowledge required
Unusual transaction type outside your normal scope
Authority Limitations:
Transaction value exceeds your approval threshold
Vendor or account changes require supervisor authorization
Policy exceptions need management approval
Uncertainty:
Multiple possible interpretations of document data
Conflicting information between document and system
Ambiguous compliance requirements
Time Constraints:
Research required exceeds available time
Need to consult with other departments
External verification needed from vendor or customer
Step 1: Click the Orange "Escalate" Button Located at the bottom of the checklist interface, next to Reject and Approve buttons.
Step 2: Add Escalation Comments A comment field will appear (similar to the rejection interface) where you should explain:
Why escalation is necessary
What specific issues require senior review
Any relevant context or information
Recommended action (if you have a suggestion)
Example Escalation Comments:
"Transaction value of €50,000 exceeds my approval limit. Requires manager authorization per company policy."
"This appears to be a capital lease that should be capitalized, but I'm not certain of the accounting treatment under IFRS 16. Need controller review."
"Vendor is requesting payment to a new bank account. Per fraud prevention policy, this requires dual authorization before processing."
Step 3: Submit Escalation The document will be routed to the appropriate supervisor or manager based on your organization's escalation hierarchy.
Step 4: Automatic Navigation After escalation, Verifi automatically moves to the next document in your queue.
The escalated document is removed from your queue and assigned to the designated reviewer. You can track its status in the audit trail if you need to follow up.
Document Counter: The counter in the top-right (e.g., "6/8") shows your current position in the document queue.
First number: Current document
Second number: Total documents in queue
Manual Navigation:
Left Arrow: Go to previous document (if you need to return to a completed document)
Right Arrow: Go to next document
Automatic Navigation: After clicking Approve, Reject, or Escalate, Verifi automatically advances to the next document.
Checklist Item Counter: The warning icon with counter (e.g., "1/10") shows how many items need attention:
First number: Items with red X requiring review
Second number: Total checklist items
Visual Status:
Green checkmarks indicate verified items (no action needed)
Red X indicators show items requiring attention
As you resolve issues, red X items should convert to green or be accepted
Queue Awareness: Regularly check the document counter to understand how many documents remain in your session.
Simple documents with all green checkmarks: 10-15 seconds
Documents with multiple red X items: 30-40 seconds
Complex documents requiring escalation: 1-2 minutes
Start with Red X Items: Focus your attention on items requiring review rather than spending time on AI-verified items unless spot-checking.
Systematic Approach: Work through the checklist in order (top to bottom) to ensure nothing is missed.
Document Reference: Always cross-reference checklist items with the actual document displayed alongside the checklist.
Context Awareness: Consider the transaction in the context of your business operations, vendor relationships, and accounting policies.
Don't Rush Approvals: Take the time to verify accuracy even when facing time pressure. Errors posted to your ERP system create more work than thorough initial review.
Trust but Verify: While the AI is highly accurate, maintain professional skepticism and verify items that seem unusual or inconsistent.
Ask for Help: Use the escalation feature when uncertain rather than making incorrect approvals.
Detailed Rejections: Provide specific, actionable feedback when rejecting AI suggestions. This helps the AI learn and improves accuracy for future documents.
Escalation Context: When escalating, give your supervisor sufficient information to make an informed decision without needing to ask you for clarification.
Professional Language: Maintain professional tone in all comments as they become part of the audit trail.
Everything is Logged: Remember that all your actions, comments, and decisions are recorded in the audit trail.
Accountability: Your approval indicates you've verified the document's accuracy and compliance. Ensure you're comfortable with this responsibility.
Documentation: For unusual decisions or exceptions, consider adding notes in the rejection/escalation comments to document your reasoning.
Learn Common Patterns: Over time, you'll recognize common red X scenarios and can resolve them more quickly.
Keyboard Shortcuts: Familiarize yourself with any available keyboard shortcuts for navigation and approval.
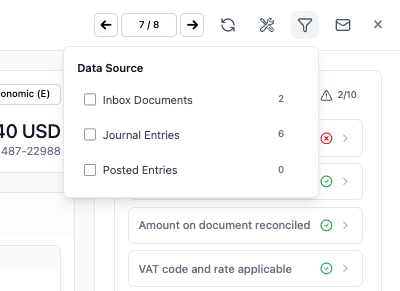
Batch Similar Items: If multiple documents have the same issue (e.g., new vendor), you may be able to handle them consistently and efficiently. Use the filter function to sort similar type of documents.
Q: Can I save my progress and come back to the checklist later?
A: No. The entire checklist must be completed in one session. Plan adequate time to complete your document queue before starting.
Q: What happens if I accidentally click Approve before reviewing all items?
A: There is one final step in between clicking Approve and Verifi posting to your ERP. The document is immediately posted to e-conomic after approval. You cannot undo this action. Any corrections must be made directly in your ERP system. Always review carefully before approving.
Q: Do I need to review every green checkmark item?
A: No. Green checkmark items are AI-verified and don't require review by default. However, you may optionally expand and verify them for high-value transactions or audit purposes.
Q: Can I approve a document with red X items still showing? A
: Technically yes, but this is not recommended. The audit trail will log that you approved with unresolved issues, and you may be accountable for any resulting errors.
Q: How many times can I reject and regenerate an AI suggestion?
A: There is no limit. Continue the rejection cycle until the AI provides the correct suggestion or until you determine escalation is necessary.
Q: What if the AI keeps suggesting the same wrong answer after multiple rejections?
A: Escalate the document to your supervisor or use the Feedback tab to report the recurring issue. In the meantime, you may need to make manual corrections in e-conomic after approval.
Q: Can I go back to a previous document after approving it?
A: Yes, you can use the left arrow to navigate to previously reviewed documents. However, if already approved, changes must be made in e-conomic directly.
Q: What happens to escalated documents?
A: They're removed from your queue and routed to the designated supervisor/manager. You can track status in the audit trail.
Q: If I expand a green checkmark item and find an error, what should I do?
A: Use the rejection process just as you would for a red X item. Provide comments explaining the error, and the AI will regenerate the suggestion.
Q: Does the document counter include escalated or rejected documents?
A: The counter shows your current position in the queue. After escalating or rejecting, the counter adjusts to reflect remaining documents.
Q: Can I filter or sort my document queue?
A: Yes you can filter but not sort the queue as it is done based on time/date of invoices received.
Q: What if I need to leave my session before completing all documents?
A: Your progress cannot be saved per individual document. But will be saved on a session level. Incomplete documents will remain in the queue for your next session.
Standard Review Process:
View document counter (e.g., 7/8) to track queue progress
Check warning indicator (e.g., 1/10) to identify items needing attention
Expand red X items to review issues
Optionally expand green checkmark items for spot-checking
Make corrections, rejections, or escalations as needed
Wait for AI regeneration if rejections submitted
Click green "Approve" button when satisfied
System automatically advances to next document
Repeat until queue is complete
When You Identify an Error:
Determine if AI suggestion is wrong or if document has genuine issue
If AI is wrong: Submit rejection with detailed comments → Wait for regeneration → Review new suggestion
If document has issue: Make necessary corrections → Resolve the issue → Approve
If uncertain: Click "Escalate" → Add explanatory comments → Submit for supervisor review
Status Indicators:
✓ Green checkmark = AI verified, no action needed
✗ Red X = Issue detected, review required
Warning icon number = Count of items needing attention
Document Version: 1.0
Last Updated: January 5, 2026
Published by: Verifi Finance ApS
Remember: The checklist is your final quality control checkpoint before data posts to your ERP system. Take the time to review carefully and use escalation when uncertain. Your approval confirms the document's accuracy and compliance.
